Recipe tea towels

Happy New Year! I hope your holidays were lovely and that you are looking forward to a fantastic 2016.

image

I wanted to share one of the Christmas projects I did this year that would be good for almost any occasion. I came across the idea on Sew Mama Sew and then a little more searching turned up Martha Stewart’s tutorial for recipe tea towels. I played around with both layouts and liked Martha’s version better.

I borrowed some recipes from my mom and aunt that were in family members’ handwriting and settled on two recipes from my great grandma (baked apples and apple pudding), one from my grandma (her signature lemon meringue pie) and my great aunt (pecan pie- my mom’s favorite). I won’t belabor the design part since I just followed the tutorials listed above and had the fabric printed by Spoonflower, but in case the interwebs need another tutorial for hemming a square or rectangle here is how I did it.*

image

Iron a crease around the image.

image

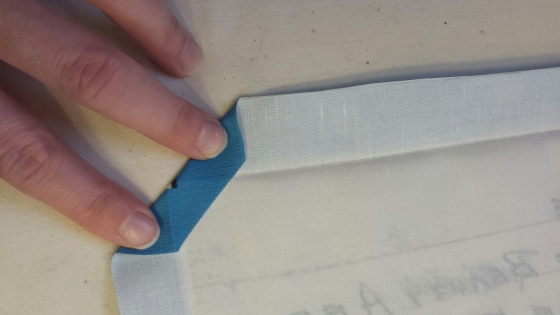
Cut off the corners at a 45 degree angle about 1/2″ from the corner of your image, then fold that corner in and iron a crease. Repeat for each corner.

image

Re-iron your original fold on all sides.

image

Turn the raw edge under to hide it in your fold and press. Repeat for all sides.

image

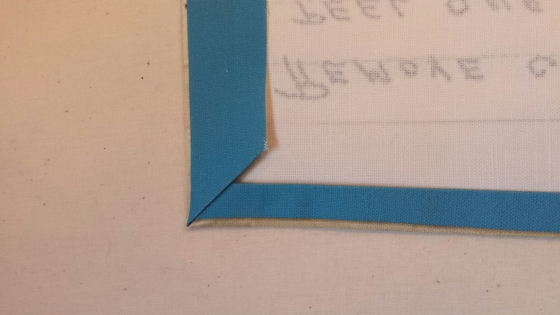
Your corners should look like this.

image

Pin twill tape, ribbon or ric-rack across the top left corner at a 45 degree angle with the ends in your seam allowance for a hanging loop.

image

Stitch around the perimeter and you’re done! (Ignore the weird tension issues in my seam above. I stitched from the top and didn’t notice the tension problem until I had finished stitching this one.)

image

Enjoy your finished tea towels!

image

I made eight (two yards of printed fabric), which was enough for my mom and her sisters, my sister, sister-in-law, cousin and cousin-in-law to have one with one left over for me. They were a hit and I am itching to make more

What were some of the handmades that went over the best in your family this year?

-Elizabeth

treat your tootsies with a free pattern

i truly meant to post this last night…but i have to admit that once my “seat” hit a seat i was done for!  i hope you all had a wonderful thanksgiving and that those of you who participate in black friday are finding some amazing deals.  as for me, i cherish the friday after thanksgiving since my house is still relatively clean, there are tons of leftovers so i don’t have to cook, and the day is wide open….free to sew, knit, read, or do absolutely nothing at all!!

so, about this free pattern.  i was invited to help danica at sew liberated build, man and disassemble her booth at fall quilt market.  it was a fantastic experience!  we had also been asked by shannon fabrics to teach a schoolhouse session class.  as a part of that class, danica asked me to design some smallish pattern that used some of shannon fabrics great fabrics and this slipper pattern is the result.

pitter-patter soft slipper

this pair was my prototype.  unfortunately i didn’t take any pictures of the ones i made for the booth.  what i love about this pattern is that you can change it up easily….using a plain exterior?  add some embroidery.  add rice-rac or trim around the top edge, add some buttons, or even piece your exterior fabric for a quilted look.

shannon’s cuddle suede is perfect for the soles.  i used regular cotton on this pair, but used the suede for all the other samples and much prefer it.  it’s easy to work with and gives a natural bit of “grip”.  since it’s hard to adhere fusible interfacings to the suede i simply cut the interfacing, placed it on the wrong side of the suede and added a few rows of stitching to hold it in place.  the interior used their cuddle fabric (softness beyond belief!) and the exteriors were cotton and double gauze.

i originally used fleece and batting in the soles, but have since discovered 2 great alternatives.  soft and stable by Annie’s, and flex-foam by pellon. all my holiday gift slippers will use one of these to add just a bit more padding.

i hope you enjoy the pattern.  to download it, go to our tutorials page and click on the highlighted text. it’s graded for 5 sizes (the medium is size 7) so you can make a pair for yourself and everyone on your gift list!  i’d love to see pictures of all the completed slippers…hope you’ll share!

kim


A little needlebook- tutorial(ish)

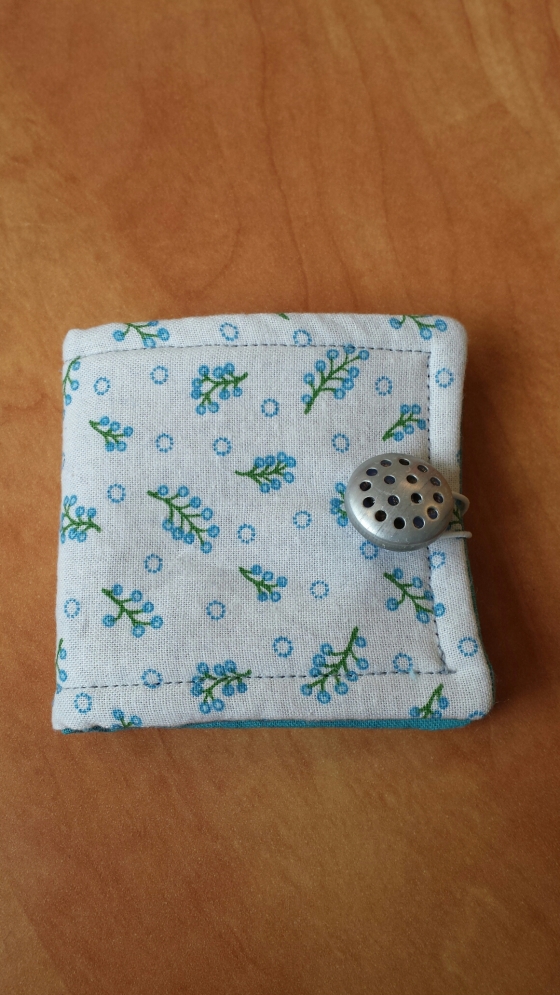
I wanted to show off a little needlebook that I made last night during the sewing class I teach at the library.

image

There are a million or so tutorials on making needlebooks on the internet, so I am not going to show the step-by-step. I cut two coordinating pieces of fabric and one piece of felt 3.5″ by 6.5″. It doesn’t matter what color that piece of felt is- it will be sandwiched between the layers. (I used felt instead of fusible fleece because it’s  cheaper and the library’s  budget for this program isn’t huge so I am trying to save where I can, but fusible fleece or quilt batting would also work.) The “pages” are coordinating felt cut to 2.5″ by 4.5″

You will also need about a 3″ piece of thin elastic. Make it into a loop and hand sew through the tails, wrapping the thread around them a few times to make a little knot. This will help keep it from popping out as you use the needlebook.

Stack the two fabrics right sides together on top of the felt with the elastic loop centered on one of the short sides. Stitch around the perimeter with a 1/2″ seam allowance, leaving about a 2″ opening on one of the long ends. Clip the corners and turn it right side out. Edge stitch around the whole perimeter. (I did 1/4″ from the edge, but you could do 1/8″ for a more dainty look.)

Fold in half to find the center and mark it with pins. Do the same with your felt pages, then place them on the cover and stitch down the center to bind your book. 

image

Close the book and mark where your button needs to go to match the elastic loop. Stitch your button on, organize your needles in the pages (I’m planning to use mine for all of those sewing machine needles that aren’t  brand new anymore but still have some life in them) and sew on!

image

P.S. my exterior fabric and button are vintage, and the interior fabric is a scrap from JoAnn long ago if you keep track of such things. 🙂

What are you stitching up this weekend?

-Elizabeth

The Pinked Pen Keeper tutorial

I’ve had a spring-y little pen holder on the brain for a few weeks since I bought a pretty journal for my secret sister’s treat this month.  I am a journal fiend, but I never seem to have a pen nearby when I need one, so this seemed like the perfect fix.

20150328_075742

Of course, it was 17 degrees and had snowed the morning I was photographing the “spring-y” tutorial, but oh well.

20150328_080237

Happy spring!

The tutorial is available as a downloadable PDF here or click on the picture below to open it!

pinked pen keeper banner

-Elizabeth

Tutorial: the Market Day Tunic as a dress

Last week I shared a couple pictures of my beautiful sister modeling our Market Day Tunic which I lengthened into a dress and sewed up in a cozy double-knit for winter.  I promised I would be back with the tutorial this week, and it may have taken me ALL week, but here it is!

Market Day Tunic as a dress pinnable image

The best thing about this tutorial is that there is practically nothing to it.  Start with the Market Day Tunic pattern, of course.  You will want about 3 1/2 yards of fabric to make the dress length (a little less if you are using 60″ wide fabric, but not much – I think I used about 3 yards of 60″ knit to make this size small.  I would recommend erring on the side of more fabric rather than less, especially if you are making a large or extra large).  Also note that you should drop down one size from what you would normally wear if you are using a knit.  I wear a medium Market Day in a woven and small in knit.

If you are using a knit you will not need to add the invisible zipper to the side seam.  There is enough ease in the pattern to do without it even with a relatively unstretchy knit like the one I used, so just sew the left side seam shut like you do the right side seam.  If you are using a woven fabric plan to install the zipper as instructed.  Aside from using a ball point needle and a very, very slight zig zag stitch to allow my fabric to stretch a bit I did not do anything differently for this dress than I do for woven Market Day Tunics.

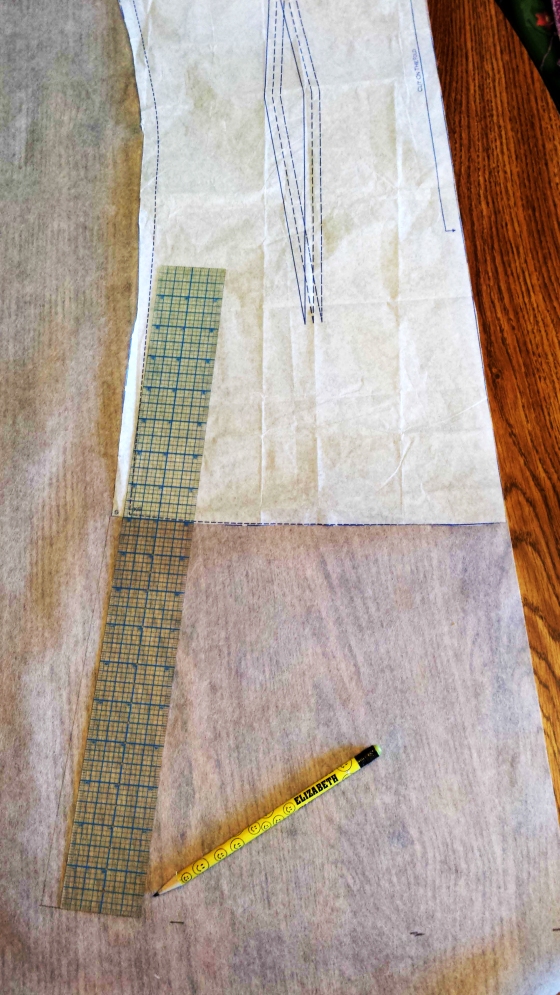
Trace out your size on Swedish tracing paper, adding 10-12″ (depending on the length you want) to the bottom of the tunic front and tunic back, following the original curve of the bodice hem.

MD back lengthened edited

Transfer the markings to your fabric as instructed.  The back darts will not be affected by the change in length, but the long center front darts can either be lengthened to the new hem length by following the line of the original darts all the way to the bottom of the garment, taking a tiny seam allowance and tapering to nothing at the hem, or tapering to nothing a little below the original hem length as I did in the tunic pictured above.

MD front lengthened edited

Finish the rest of the dress according to the tunic instructions.  For this dress I flipped the double knit to show the wrong side on the interior neck facing and the sleeves, which I rolled for a fun little contrast, but you could do a contrasting neckline facing or lace appliqued facing like our original samples, too.  

Since I used a knit with a hidden neck facing I didn’t finish the outside edges of the facing so as not to add bulk and just tacked the facing to the shoulder seam allowance to keep it tucked in.  If you use a woven, finish the neckline as instructed.

MD facing

My only complaint with this dress (and it’s the same complaint I have with ALL dresses and tunics in the winter) is that it rides up over leggings or tights when I walk.  I’m thinking that stitching a wide ribbon around the inside hem would add a little weight and slipperiness and might prevent the cling.  Has anybody tried that?  Did it work?

What are you sewing up this winter?  If you make one of our patterns and would like to share, please drop us a line at ohsnapdragonstudios@gmail.com.  We’d love to see what you create!


behind the amylynn wrister

random gatheringabout 2 years ago…or it could have been 3 (i mean, wasn’t 2008 just a week and a half ago?) my son’s dear girlfriend (yep…amy) asked for my help in creating a fabric cuff similar to one she had seen elsewhere (a store? on the street?  i can’t remember….hey, it’s been a week and a half!!)  the funny part here is that she wanted to make the cuff/wrister for her friend elizabeth (yep…elizabeth…as in my now business partner elizabeth).  we headed down to the studio….which was better known then as “the corner of the cellar” (not really a cellar, but it always sounded so much more dramatic that way!!) and we fiddled with fabric scraps until we came up with just the right size, just the right fabric, just the right button.  i’m not sure if elizabeth ever actually received one, but amy wore hers proudly.  we said then that this little wrister would make a great quick gift and i tucked the idea away (for at least a week and a half).  then elizabeth and i began snapdragon studios and we knew that it would make a great tutorial…..and so we have the amylynn wrister,  named for the lovely amy who brought the idea to us…thanks amy!!

i hope you’ll enjoy making one (or a dozen) as much as i have.  they’re sort of addictive….at first you’ll agonize over fabric/button choice wanting to get the perfect combination…and soon you’ll find that this wrister is adorable using any and all fabric combinations.

stocking stuffers, teacher gifts, one to show your dearest friend that she means the world to you….and a few just for you!!  we’ve put it  together for you in 10 easy steps…..you’ll have a dozen made in no time at all (definitely less than a week and a half!).

kim

finished on modelfinished and wearing


The AmyLynn Wrister Tutorial

We have a little present for you this chilly Monday morning!  We’ve developed a tutorial for a snazzy little wrister that was the brainchild of our wonderful photographer Amy.

Click on the picture below for the downloadable PDF tutorial!  What are your favorite accessories for fall?

The AmyLynn Wrister

The AmyLynn Wrister

AmyLynn Wrister


a note from kim:  elizabeth sorta surprised me with this post this morning, so i didn’t get the chance to add some more great photos and a little back story….stay tuned wednesday for more!!

a design for “dear stella”

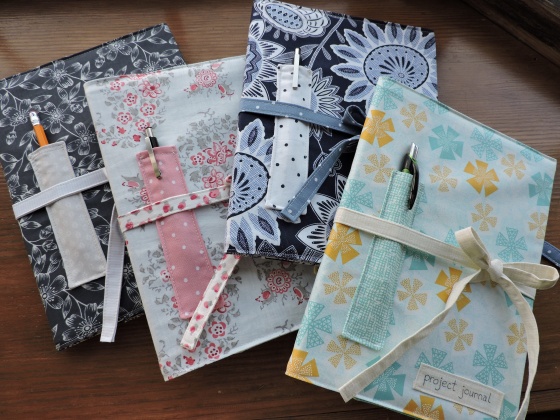
we met some wonderful people at quilt market last may.  we introduced ourselves and snapdragon studios to a LOT of manufacturers and designers.  but we were still a bit surprised (very pleasantly of course!) to hear from not one, but TWO of the fabric manufacturers not long after we returned home.  both had sent out an invitation to submit design ideas for their websites featuring their fabrics.  both (!) purchased some of our designs and this past week, dear stella released our journal cover as a free pattern.  they blogged about the cover and let us know that it was ready to share….so we’re sharing!!

it’s such a simple project….easily completed in just an hour or so….and who wouldn’t want several of these cute covers for those inexpensive composition pads?  great for keeping track of projects/ideas/sketches/grocery lists.  there’s a pen pocket on the front and a bigger pocket on the inside cover for loose notes or receipts…all tied up to keep it tidy…a perfect gift!

our own amy did an amazing job of photographing the samples i made, along with the instructional photos included in the tutorial.  she even managed to make my scrawny old lady hands looks professional!

here are just a few shots of the samples i sent off to dear stella…

this is the one we used as our assembly sample.DSCN5232

but this one has to be my favorite one….just love this fabric!!DSCN5235

i added some buttons to a couple of the samples….really you could use anything to make these your “own”….embroidery, button, labels, maybe even a tiny pocket in the corner. (and you can tell that these are my own pics because they’re blurry!!  sorry amy!)DSCN5237DSCN5236

and here’s the entire collection.  of course i’ve already made several more for myself already!DSCN5238

you can see dear stella’s entire collection of fabric here, along with lots of other free patterns and ideas.  i hope you’ll make a few…and don’t forget to share them with us!!

kim

Pinafore Dress for a little girl

When I started thinking about what I wanted to make for our baby, I knew right away that I would make a pinafore dress with a sweet little pair of bloomers to peek out underneath in case we have a little girl.  I’ve seen pinafore dresses (or apron dresses, or cross-over dresses) around, and I know it’s an old style, but I had no luck finding a pattern that was small enough – most of the ones I found started at 6 months.  (This one from Owly Baby (link goes to Pink Chalk Fabrics) was the closest to my “vision” that I found, but it starts at 6 month size and without a front view I wasn’t quite ready to pull the trigger.)  Other similar patterns are the Criss Cross Dress from Smashed Peas and Carrots (starts at 6 month size) and the Criss Cross Dress from Melly Sews (3-6 month size, but the straps come up from the front and cross to the back instead of wrapping around back to front as I wanted.  After hemming and hawing for way too long, I decided to start with the Melly Sews pattern (which she offers for free on her blog with a subscription to her email notifications) and adapt from there.

100_1917 cropped and edited


Here’s what I came up with.

Download the (very quickly hand-drawn and scanned) PDF pattern here (prints on 5 pages) and assemble it:

Pinafore dress 3-6 month size July 2014

You’ll need:

2/3 yd fabric (I used chambray, but this would be cute in any soft cotton)

2/3 yd lining (can be the same as your fabric or a contrasting printed cotton to make it reversible)

2 buttons (or 4 if you’re making the dress reversible)

20140717_143330

I didn’t photograph the steps as I was making it, but it’s really simple.

There’s only one pattern piece: cut it on the fold from the fashion fabric and from your lining fabric.  You can make this reversible, but I chose to self-line it because the Robert Kaufman chambray I used will be so nice and soft against baby’s skin.

Put your fabric and lining right sides together and sew all the way around, stopping and backstitching about 3″ before you reach your starting point.

Clip the curves in your seam allowance so that it will lay nicely when you turn the garment right side out.

Turn right side out through the opening you left.  A chopstick or turning tool makes turning the straps easier.

Press the garment, turning the seam allowance of your opening to the inside.

Slipstitch the opening closed and topstitch all the way around the edge if you wish.  (I skipped topstitching, but the benefit of doing it is that you’ll have a nice crisp edge and the dress won’t get quite so tangled up in the wash.)

Stitch buttonholes in the ends of the straps according to your button size following the instructions in your sewing machine manual.

Stitch on your buttons at the ‘X’s.  (Keep in mind that you will need buttons on both the inside and ouside if you are making the dress reversible.)

That’s it!

I used Melly Sews’ bloomer pattern with the only change being that I pinked the edges of the ruffles instead of finishing them and I sewed them on in a wave instead of straight across.

So that wraps up the baby sewing at least until we find out what sort of tiny human will be wearing the things I make.  If we don’t have a girl, I really hope a friend does soon, because this dress and those little bloomers are too stinkin’ cute to be packed away for long.

If you have some baby sewing to do and you missed the tutorial on adding a belt and cuffs to a romper, it’s here.

100_1917 edited


Now we’re just waiting on a baby to wear them!  Don’t forget to watch for the quilt giveaway – my midwife says I could go into labor any minute!  🙂

-Elizabeth

How to add cuffs and a belt to an infant romper

I posted last week about the little boy’s outfit I made and I promised a tutorial about how I added the belt and cuffs to My Taylor Made’s romper pattern.  I’ll apologize in advance for the incredibly uneven lighting – the day I photographed this it was overcast and raining one minute, bright and sunny the next and I lacked the enthusiasm to either get out a better lighting set-up or edit the photos more than the bare minimum.  Jack was also “helping” me with these projects, so there are some errant toddler hands here and there.  Hopefully these are enough to give you some idea of how to go about modifying a pattern, though.  My brain is a little fried, so this might be about as clear as mud, but feel free to leave questions in the comments and I’ll try to respond quickly!

100_1902 edited

First I decided what size I wanted the belt to be.  I wanted the belt to end as little tabs in front with working buttons so that I can add extra buttons toward the middle if the waist needs to be cinched in more, so I measured 2″ in from the side seam, around the back, and 2″ around to the front again.  That was the finished length I wanted, so I added 1″ to my length to account for seam allowance.  I wanted it to be about 1″ wide finished, so I cut it 2″ wide, again to allow for seam allowance.  For the 3-6 month size romper I was making it worked out to be about 17″ long and 2″ wide.  (Mine has a seam in the center back because I was using up scraps, but it could easily be cut from one piece of fabric.)  I also wanted the ends to be rounded instead of square, so I folded the belt in half to cut both short ends at once, traced a little dish to get an even curve and cut it.

100_1891 edited

I thought about piping the edges of the belt, but I thought that might be uncomfortable for baby to lay on, so I decided to make the lining a little bigger than the outside fabric so that it would show.  If you want this look, cut your lining fabric 1/4″ bigger on all sides than your outside fabric, following the shape of the curve on the edges.  (At this point, have a heart attack because your toddler got his hands on your rotary cutter and was very close to figuring out how to slide the cover down on it.  Put rotary cutter away, redirect toddler with the snap setter and carry on.)

100_1892edited


I sewed one long side first, just to have a stable edge to work with, then pinned the heck out of the rest of the edges and stitched.  Don’t forget to leave a space to turn it right side out.  I sewed around one curve and part of the other straight side, stopped, backstitched, left about a 3″ space, and then finished sewing the rest of the straight side and the other curve.

100_1894 edited


When you’re finished sewing around all of the edges it will look like this:

100_1898edited


Turn it right side out through the opening you left.  A chopstick (or “turning tool”, if you’re fancy) is really helpful for this.

100_1899edited


Press it flat and slipstitch your opening closed.  It should look something like this.  You might notice that I got lazy and didn’t leave quite a full 1/4″ around my curves, so they’re not as even as the long edges.  It’s not super obvious, but learn from my mistake and don’t be skimpy on your seam allowance.

100_1900edited


Stitch your buttonholes according to your button size and your sewing machine’s instructions.

100_1901edited


I stitched a straight seam down the center back of my belt to hold it to the garment.  Since I already had a seam there from piecing my fabric it wasn’t super obvious, but if you don’t have a seam there you might want to do something decorative like stitching a box with an X through it, stitching in the ditch next to the lining fabric or slipstitching the belt on so that your stitches won’t show.

100_1902 edited


Sew your buttons on and you’re done!  (The shadows on the romper above are my head and Jack’s head.  He was standing on a chair at the table watching the proceedings very carefully).

Adding the cuffs is even easier.  Measure the bottom of the leg opening, cut your lining fabric to that size and about 5″ wide and stitch it on.  Hem the unfinished edge of the lining.  Press the seam allowance so you have a nice, crisp seam.

100_1903edited

Flip the lining to the inside and press again, then, treating the lining and the outside fabric as one piece, hem the inseams to finish the edges.  I also handstitched the lining to the seam allowance of the outside leg seam to keep it from sagging.

100_1905 edited

I laid the romper alongside one of Jack’s old outfits to see how far I should turn the cuffs up, then pressed them to get a crisp edge.

100_1908edited


Install or hand-stitch on snaps and you’re done!

100_1909edited


Happy sewing!
-Elizabeth